Lesson 1: Introducing Electronic Components
This lesson will be taking a look at how all of our discrete components work and we build some basic circuits.
I made a few mistakes in the lecture so refer to these notes if you find inconsistencies
Zoom Recording of the Lecture
Pre-reading
- Before the lesson you may want to look at these sources which go over some basics concepts that I cover during the lesson. These will be especially helpful if you are a beginner because I won’t go into all the details.
- These are optional but I suggest at least going through the material you are unsure about. Since this is the first “real” lesson there are more concepts to cover. Read as much or as little as you need or have time for.
- Voltage, Current, Resistance, and Ohm’s Law
- If you have never encountered circuits before or would like a nice review of the basics, this article is a good source of knowledge
- What is a Breadboard
- If you have never built a physical circuit, then I recommend this article about breadboards which are used to layout circuit components
- Capacitors Explained
- Capacitors can be a bit tricky so and this video provides some nice visuals. I highly recommend you watch this to understand what a capacitor is and how it works. Capacitors are an integral part of our project
- What are diodes
- This goes over the basics of what a diode is and how to use it (only need to read the first few sections)
- How to use LEDs
- This explains the basics of how to use an LED
- Electricity
- For more information on electricity, this web page has some great links for a variety of related topics
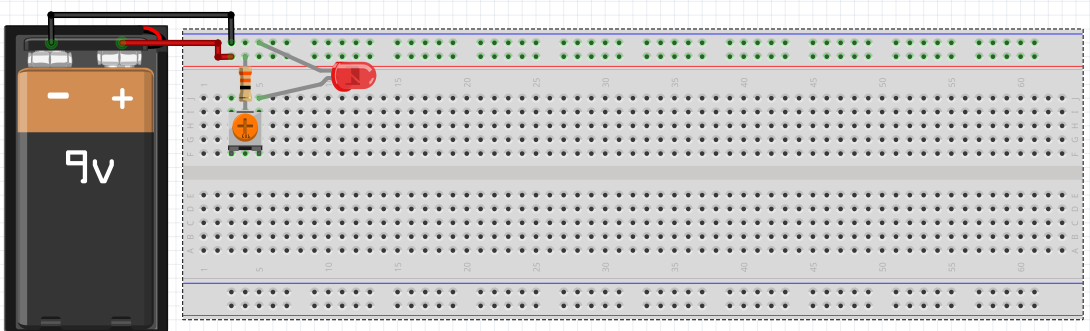
Circuit 1: Light up an LED on a breadboard
This circuit is simple and will help you understand how a breadboard and led work as well what resistor value to choose using a current calculation.
Solving for Values and Making the Circuit Diagram
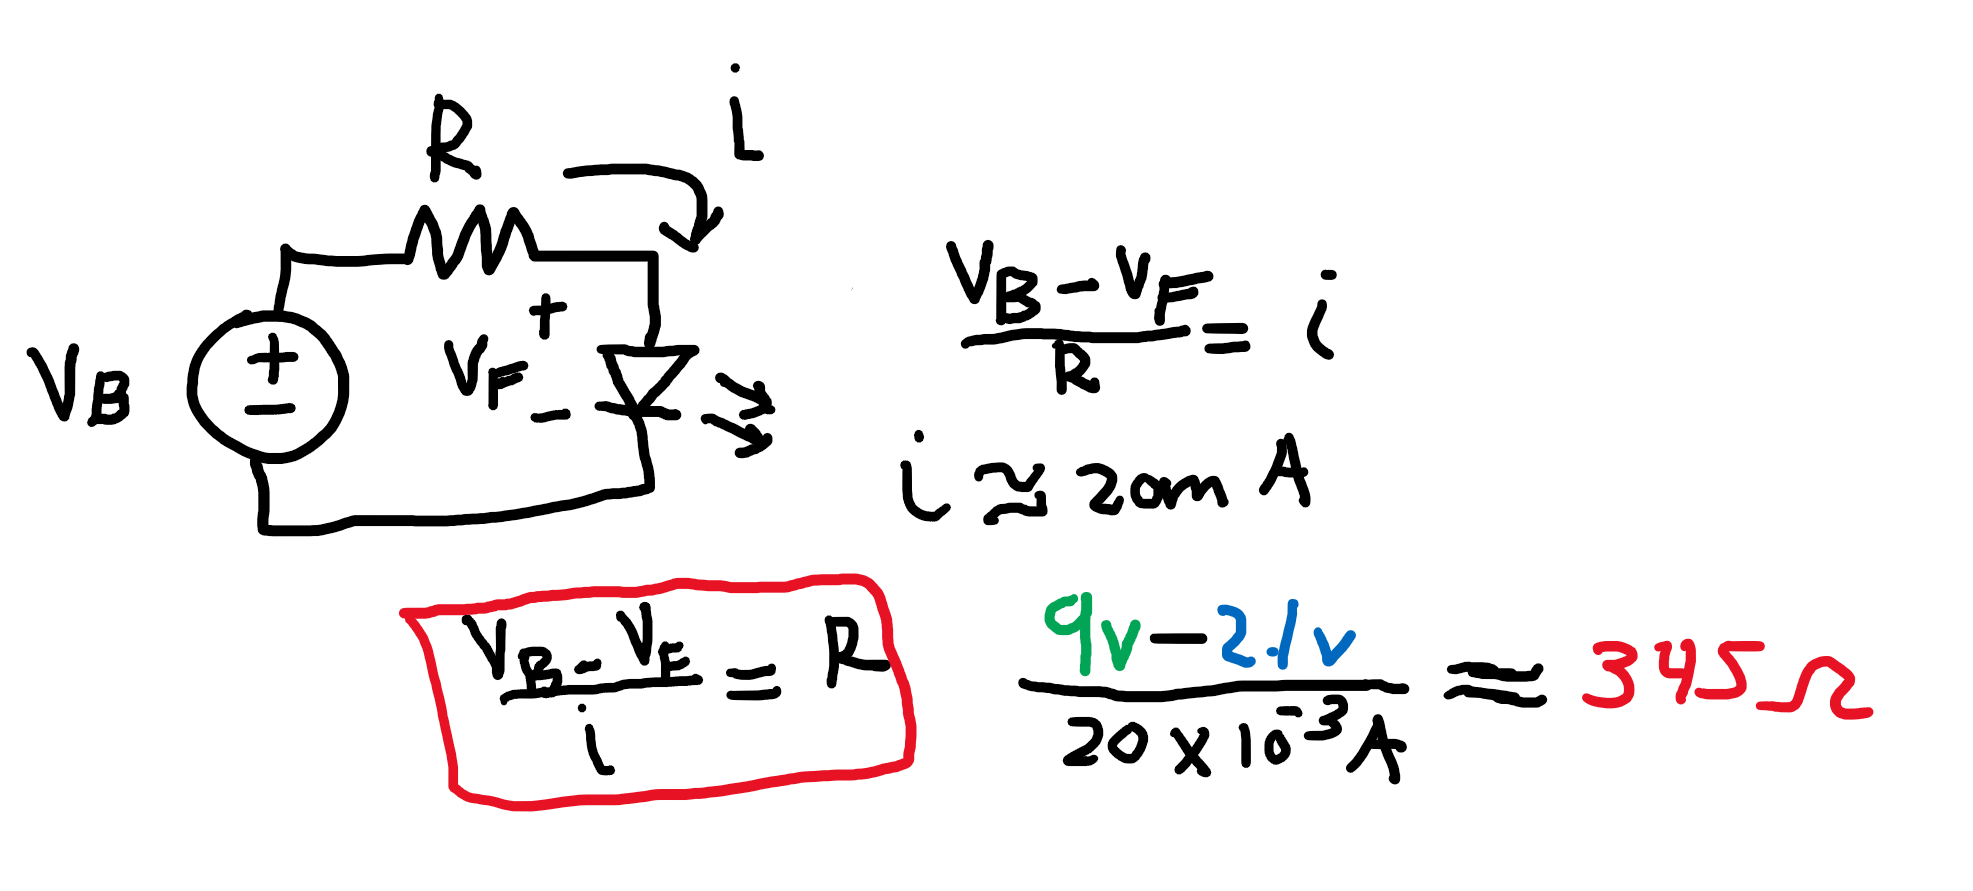
Before putting anything on the breadboard we want to derive some values and draw a circuit diagram. The goal of this circuit is to light up the LED. So how do we do that?
- For an LED to “turn on” which means current flows through it, we need to have a certain voltage accros its terminals called the forward voltage. We can find this value in the datasheet. This value varies slightly based on the amount of current but in general we can assume the voltage drop accross the LED remains relatively constant.
- The forward current however can change easily (causing the LED to become brighter or dimmer) and we can damage the LED if the current is too large. The recommended current value can also be found in the data sheet. This LED is recommended to be used at 20mA and has a forward voltage of 2.1V at this current.
- In general it is a good idea to refer to the data sheet for these values but most standard LEDs have similar values for forward voltage based on the LED color.
- So we know the current throught the led is 20mA and the voltage drop is 2.1V. Let’s now place it into a circuit.
-
We can’t just place the led in series with the battery or it will burn out because there is nothing limiting the current. So we need to place a resistor with a value that will allow 20mA to go the LED. So let’s derive an equation for the resistor value so that our led will turn on.
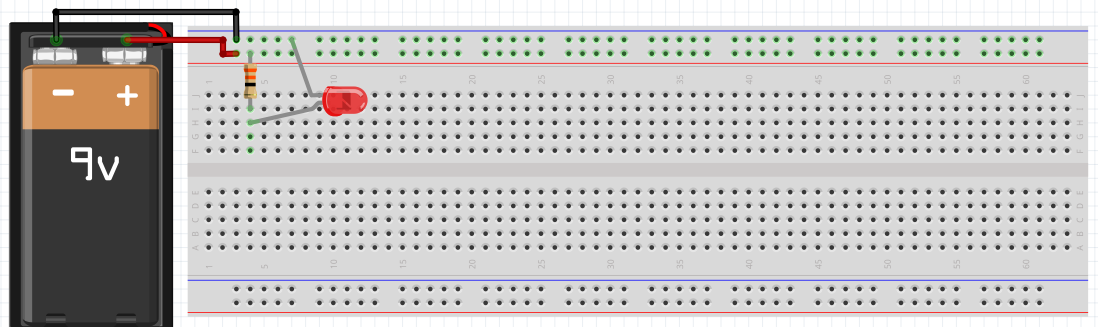
- Now let’s build the circuit on our breadboard from the schematic. Remember that for a breadboard that the rows and columns are connected as shown in the image. Another thing to mention is that an LED is polarized so it only allows current to flow in one direction. The long leg is called the anode and is the (+) side while the short leg is the cathode and is the (-) side.

Circuit 2: Adding in a Potentiometer
The next thing we want to do is add in a potenetiometer which is an element that will enable us to control the brightness of the LED
How a Potentiometer Works
A potentiometer has three terminals and can be used in two different ways:
1. Variable Resistor
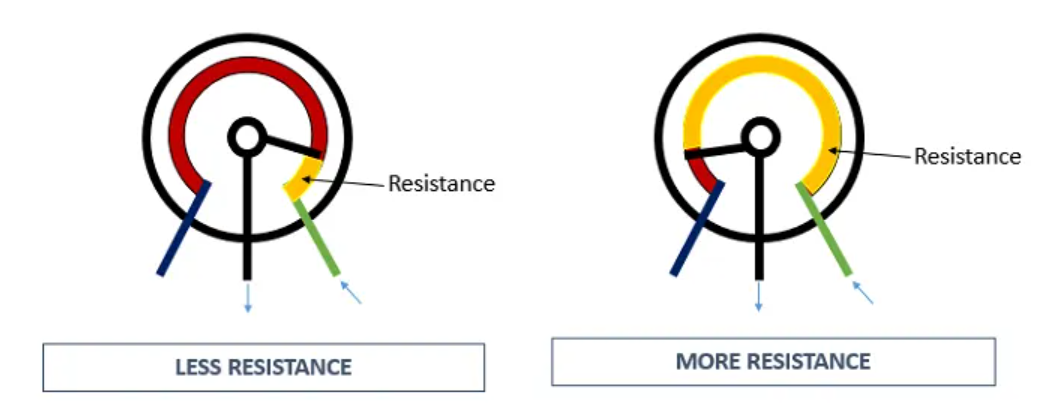
- In this configuration we only use two of the terminals, the right/left and the center
- The center terminal is connected to a wiper which we can rotate using the knob
- As we rotate the knob, the resistance between the center and an edge terminal changes from ~0 –> ~Rpot where Rpot is the rated value of the potentiometer and the max resistance.
- It is a good idea to place a resistor in series with the potentiometer when using it in this configuration because if we turn it all the way in one direction then we essentially have a short circuit.
- Now let’s put the potentiometer into our circuit. You will see that as you rotate it the LED will get dimmer or brighter because we are changing how much current goes to the LED. Notice that the maximum current is ~20mA because we put the 330 Ohm resistor in series.
2. Voltage Divider
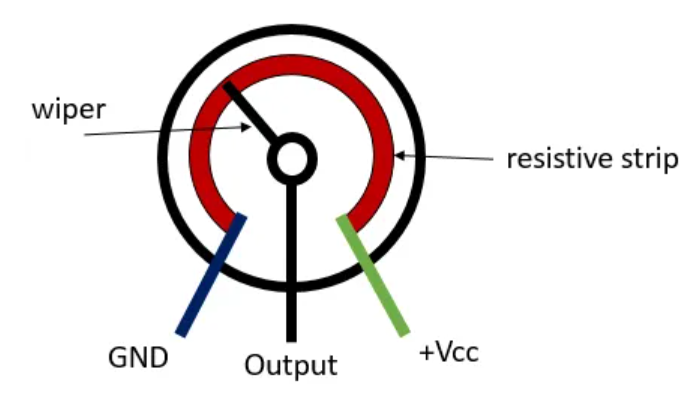
- In this configuration we use all three of the potentiometer terminals
- In general a voltage divider is a circuit in which we use resistors to essentially split the input voltage in proportion to the value of the resistors
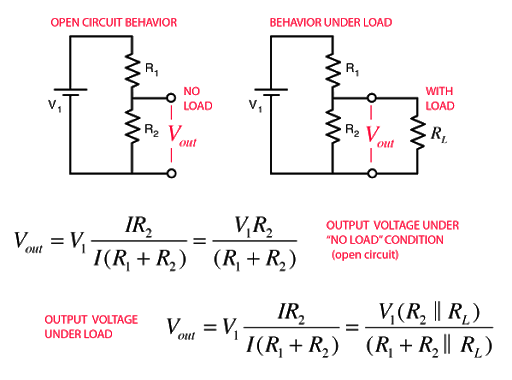
- We can see the formula in this diagram for the output voltage between two resistors
- The only difference with the potentiometer is that R1 and R2 are determined based on the position of the wiper
- Something important to note is that in this configuration R1 and R2 add up to Rpot
- In our final circuit we will be using the potentiometer as a variable resistor because we want to alter the current and not necessarily the voltage
- Now let’s alter our circuit from before so that we are in the voltage divider configuration
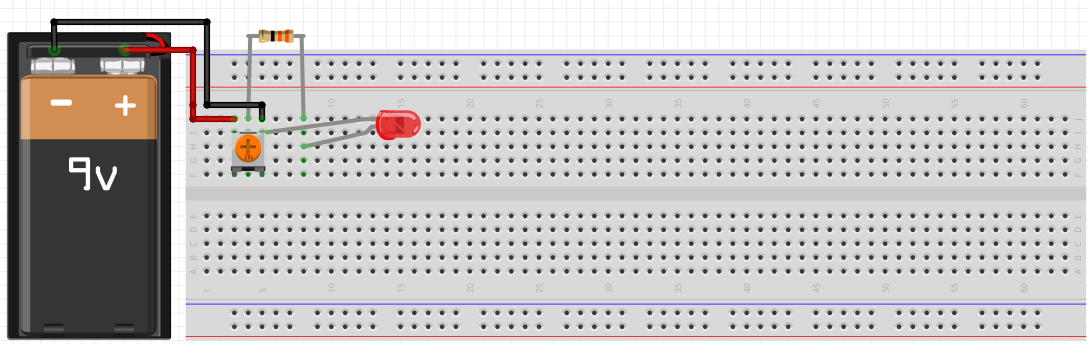
- The main difference between this circuit and the variable resistor circuit is that before we were altering the current by directly changing the resistance
- However, in this new configuration we are altering the current by altering the voltage
Circuit 3: Capacitors
Next we will add one more component to our circuit, a capacitor.
Capacitor
- a capacitor is an “energy storage element” that can store electric charge
- I highly advise that you watch the video in the pre-reading about capacitors
- When a voltage is placed accross a capacitor, current will start to flow and “charge” the capacitor
- As charge collects on the capacitor plates, the voltage accross the capacitor will increase until it matches the applied voltage at which point it will stop charging
- an important fact about capacitors is that they do not follow ohm’s law (V = IR does not apply). The current-voltage relationship is more complicated and depends on time as shown below

- We don’t need to understand the details of the math but the idea is that the current flowing for a capacitor is related to the change in voltage across it because current is the rate of flow of charge.
- So as the current increases, more charge flows per unit time causing the capacitor to charge up faster which means the capacitor voltage also increases faster.
Let’s look at an example circuit that will show how a capacitor can be used
- when we unplug the battery the capacitor will act as a secondary voltage source temporarily
- However, with this circuit we have the problem of a small capacitor which cannot store a lot of charge
- We can attempt to increase the time constant by raising the resistor value but that will make the LED very dim
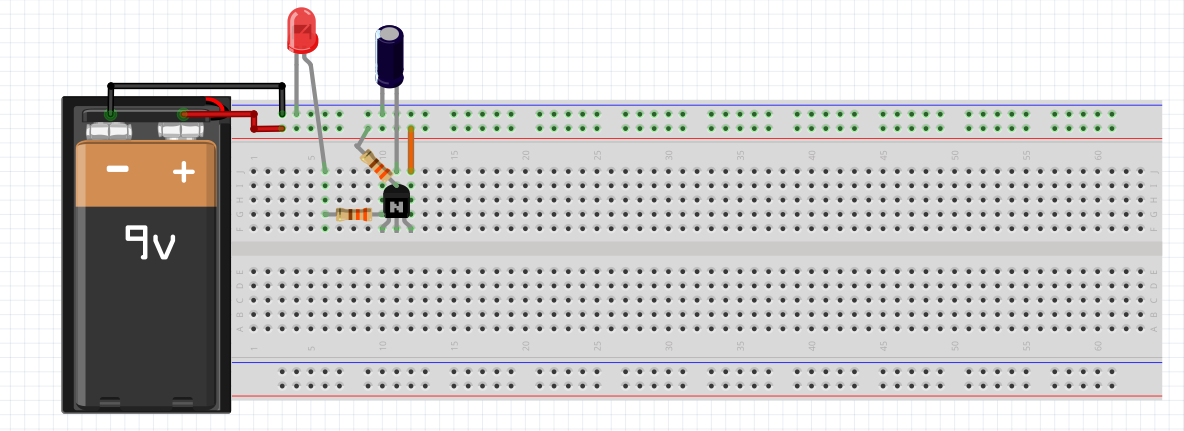
BJT
One solution to this is to boost the current using a BJT, a type of transistor. I will save the details of the BJT for another lesson but here we use the BJT in the emitter follower configuration. I said “common emitter” in the lecture which was a mistake.
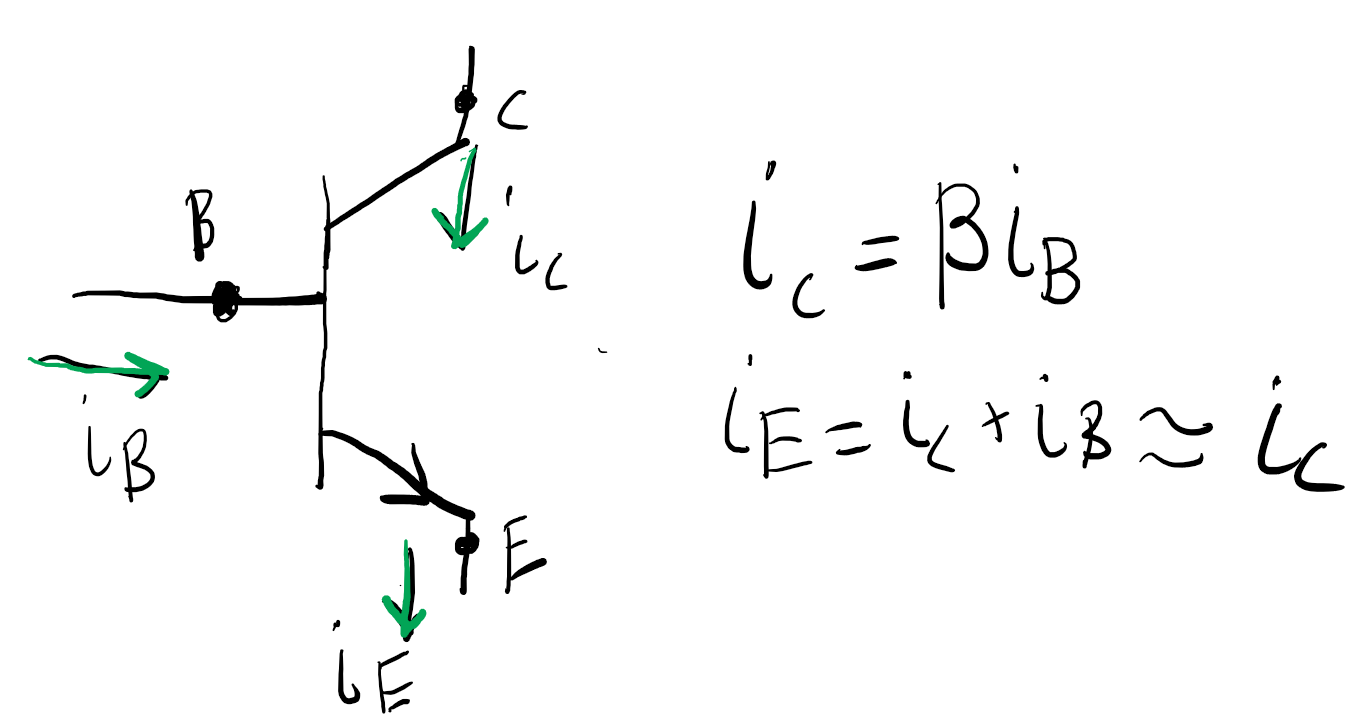
- a BJT has three terminals, the collector, base, and emitter as shown in the diagram
- when a BJT is “on” (forward active), the collector current is proportional to the base current multiplied by beta which is a constant yoou can find in the data sheet or test for using a multimeter
We will use this property in order to light up our led using the small capacitor we have. I made a mistake in the diagram during lecture, the resistor should be connected as shown here, not directly in series with the capacitor as shown in lecture
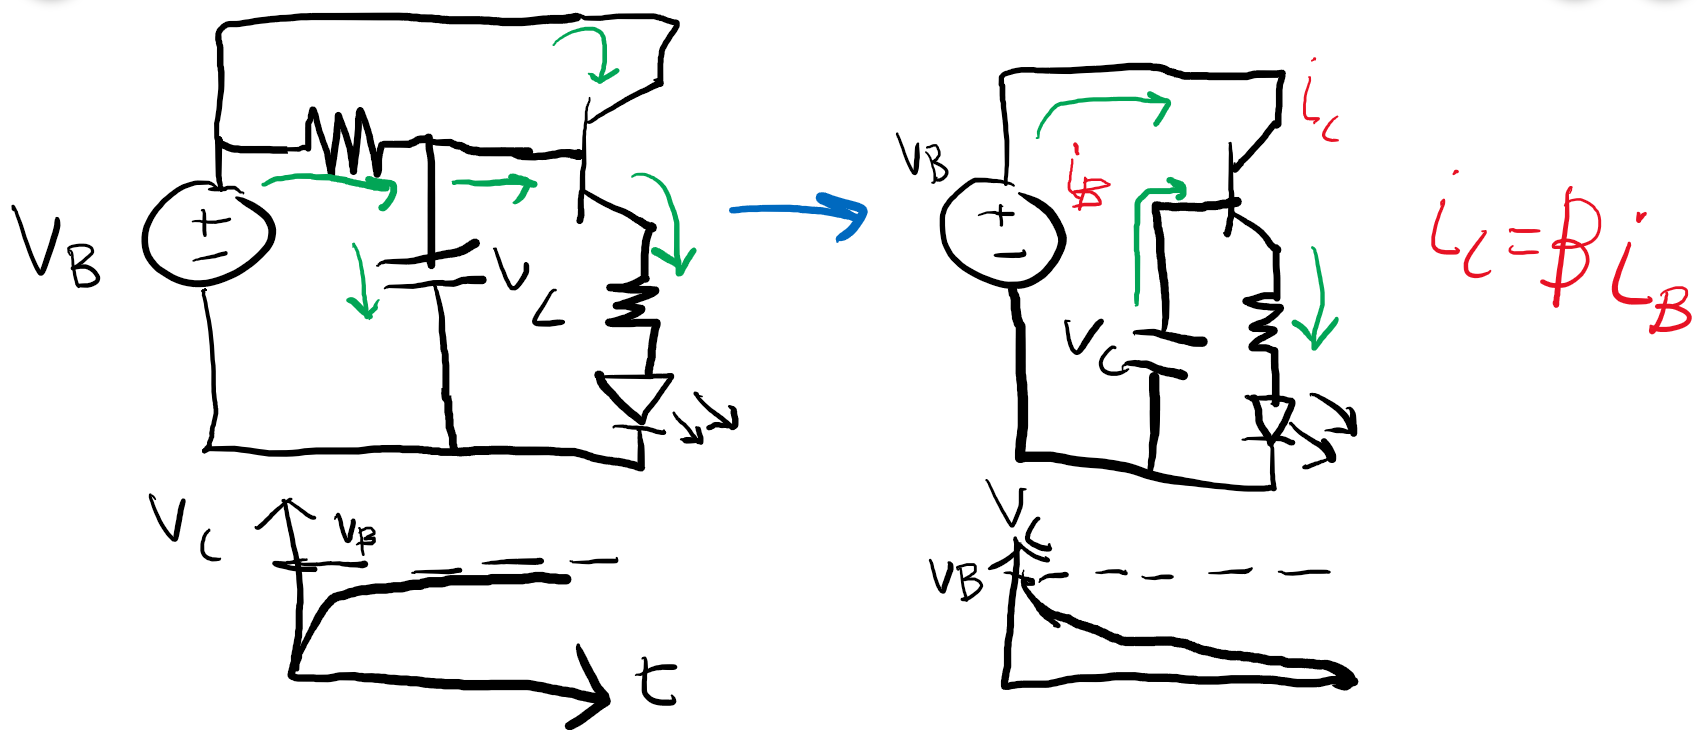
- so in this diagram we see the circuit in two states
- the first state is on the left side and is the charging state
- here the LED is on and the capacitor charges to match VB (9v) as shown in the Vc vs time graph
- the second state is on the right side and is the discharging state
- here we remove the top resistor, disconnecting the battery from the base, causing the capacitor to discharge
- note that the battery is still connected at the collector and is what provides the larger current
- the first state is on the left side and is the charging state
- So even though the capacitor current is small, we boost it with the BJT
- The effective time constant is not trivial to calculate because we need to find the input resistance which I may talk about in a future lecture
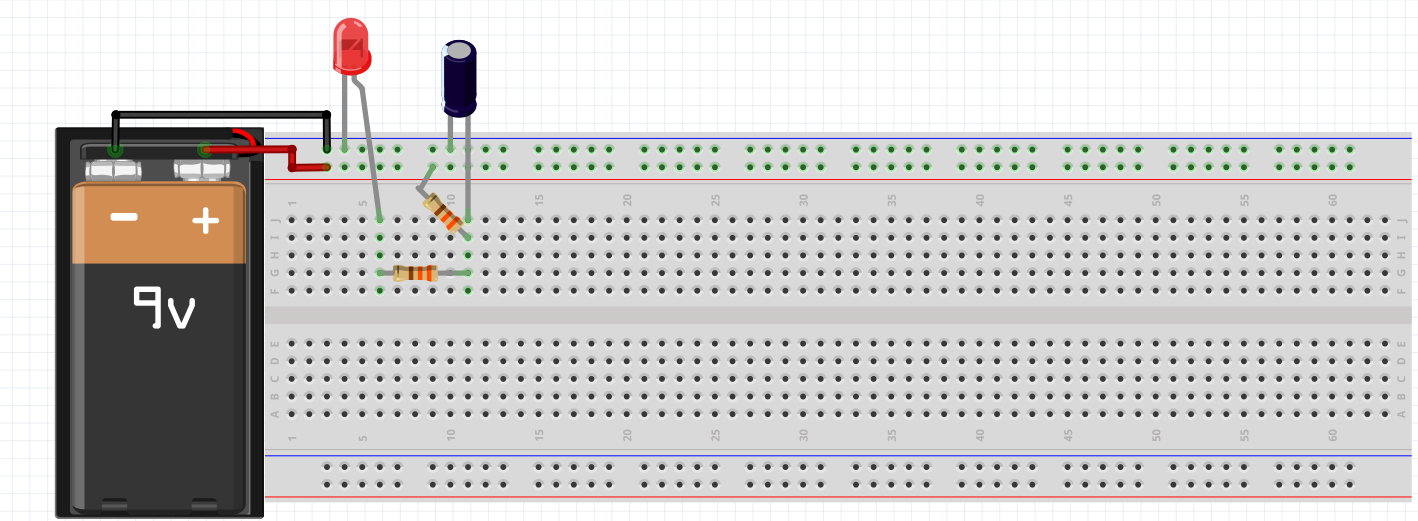
The breadboard schematic for the circuit is shown here. Use 330 Ohm resistors for this circuit