Lesson 3: Image Processing and GUI Development
Learning Goal
To learn about the implementation of the trained Convolutional Neural Network and introduce the GUI design part of the project
Pre-Reading
What is Image Processing (Video):
https://www.mathworks.com/videos/image-processing-made-easy-81718.html
What is Computer Vision (Article):
https://www.v7labs.com/blog/what-is-computer-vision
Review
Last class we built the database and then went through the process for making and training a simple CNN, which included the steps:
- Importing data from the workable database
- Splitting the data into test and training data
- Defining our network architecture
- Training our network with specified parameters
- Testing the model for accuracy
- Saving the network to be used later
The functions for each of these stages from the MATLAB Deep Learning Toolbox is given in detail in the lecture material on the UCSB IEEE website under Lesson 2.
Then we went over the various ways to improve you models performance to get more accurate results, which include:
- Increase hidden Layers
- Change Activation function
- Change Activation function in Output layer
- Increase number of neurons
- Weight initialization
- More data
- Normalizing/Scaling data
- Change learning algorithm parameters
This is a more complicated process than it seems and improving the model’s performance is at the heart of what it means to be Machine Learning Practitioner. In general, building a model is easy, the hard part is working with the model and the data to get the most accurate result.
Computer Vision Aspect of Project
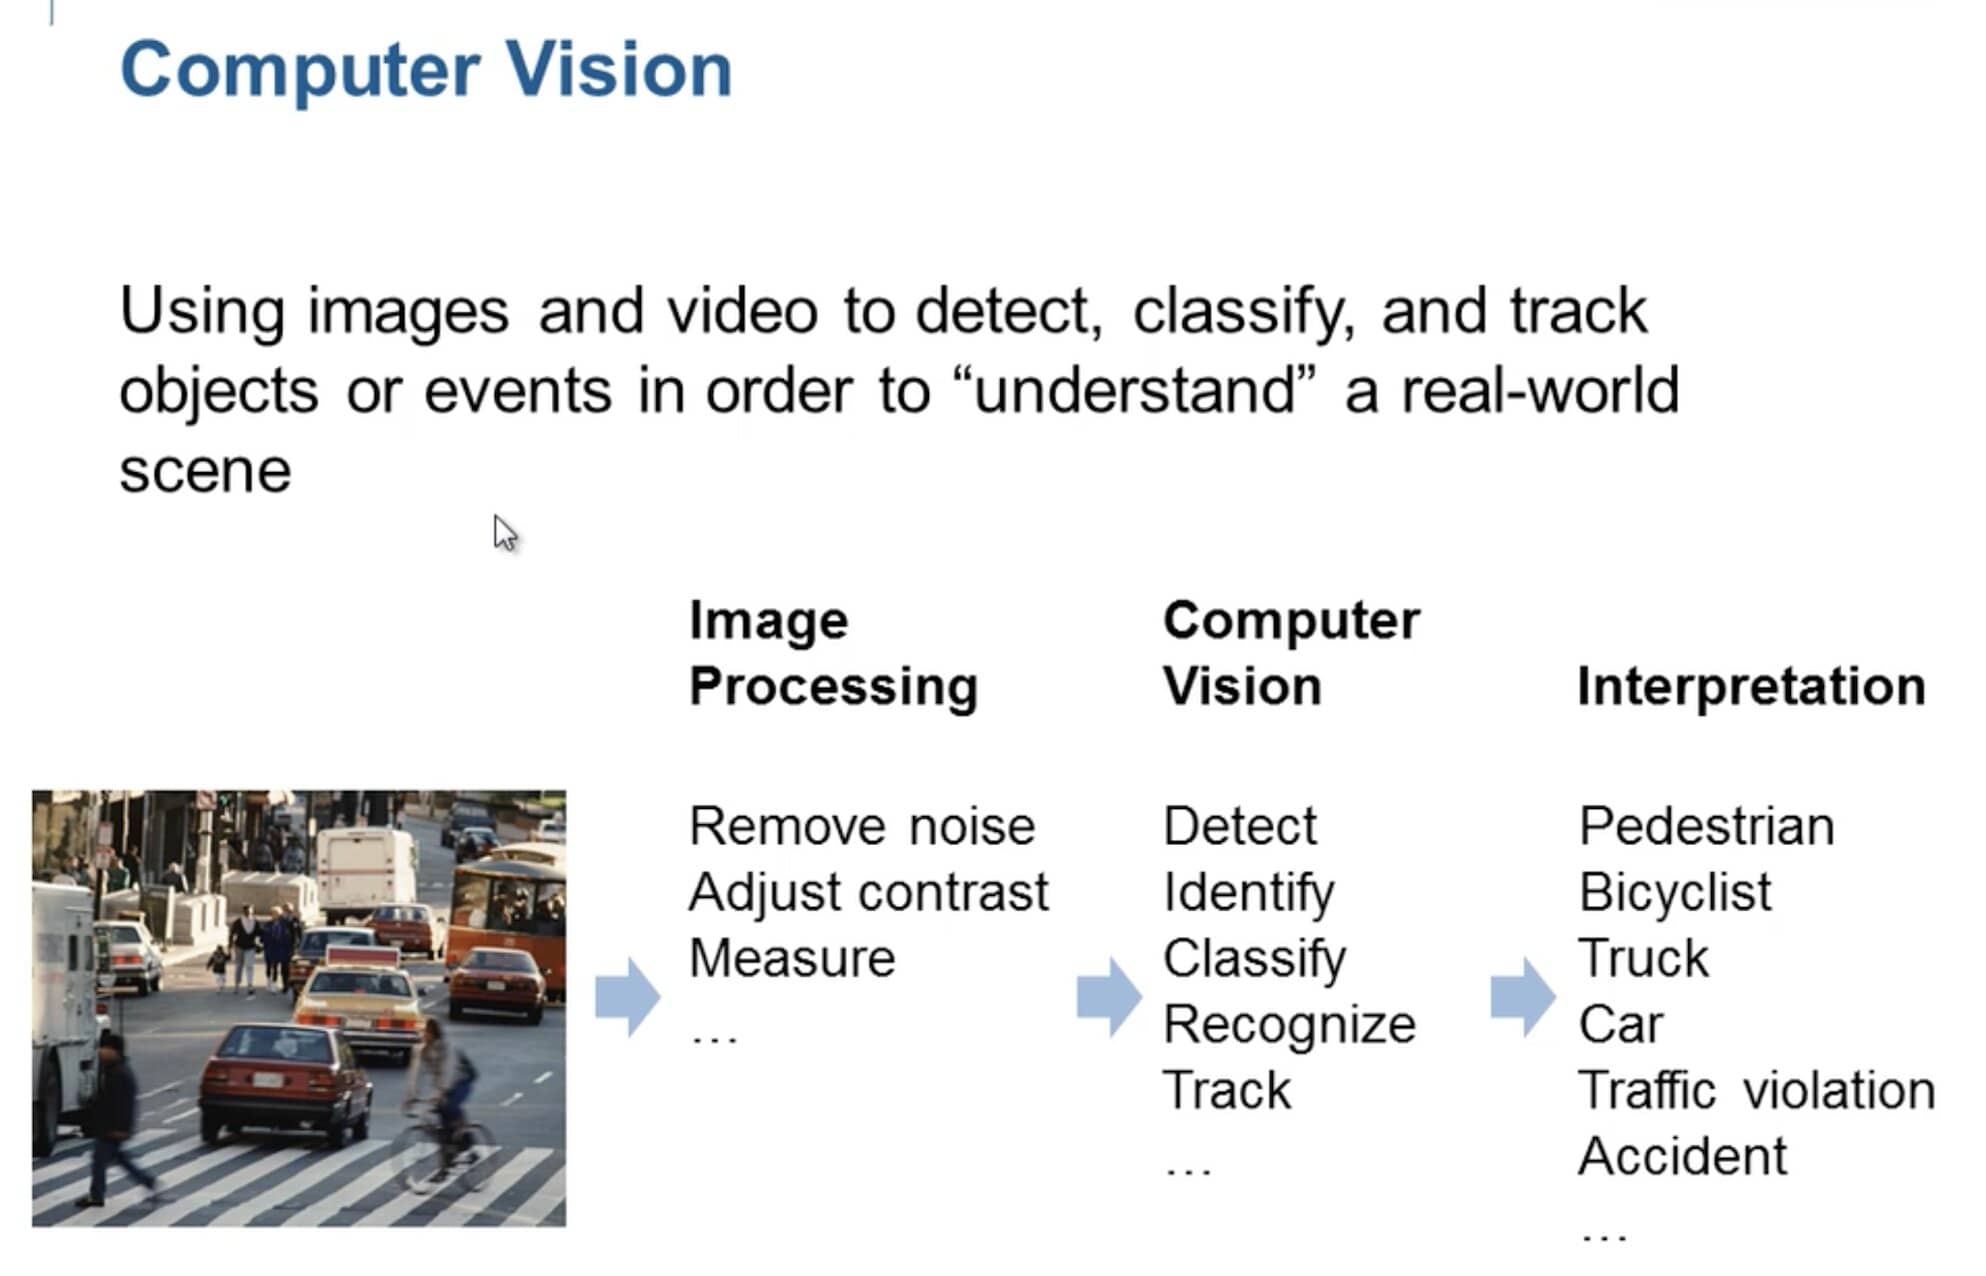
Let’s get a general understanding of what Image Processing and Computer Vision are. The principle in Computer Vision is to create techniques and algorithms that machines and computers can use in order to imitate how humans see and understand the world around them through a visual aspect. Computer Vision can be precisely defined as using images and videos to detect, classify, and track objects or events in order a “understand” a real-world scene. The process of computer vision also follows this general track:
- You have an input image or video that you want to apply computer vision to
- You must first process the image and clean it in order for the computer to be able to better understand the aspects of the image you would like to analyze. The purpose of this step is to prepare the image for the computer vision techniques you will use. This includes techniques such as:
- Binarizing the Image, which is make an image just solid black and white in order to contrast image objects with the background
- Removing Image Noise
- Measuring Certain Pixel values in the image to get parameters for further processing
- Adjusting Contrast in the image to bring out certain objects more from the background such as normalizing the pixel value range
- Then you perform the computer vision applications you want to perform on the image such as: Detection, Identification, Classification, Recognition, and Tracking
- Finally, you have interpret the computer vision techniques you performed in the previous step so determine if it is, for example, a pedestrian, bicyclist, truck, car, etc.
The image below gives a good visual representation of this process:
Now the reason we need to perform some computer vision techniques for this project is that the CNN we trained in the previous lesson was trained to recognize emotion on images of pixel sizes 48x48. In today’s lesson, we are accessing the built-in webcam of your laptop or computer and processing images from snapshots of this camera stream. However, these snapshots are hundreds of pixels in length and width and in rgb scale. We need to somehow reduce the number of pixels from hundreds by hundreds to a 48x48 pixel frame that captures just the face.
1.So the first step in the Computer Vision process for this project is to acquire an image of someone’s face in real time through the webcam attached to your computer.
To access your webcam, we are going to use the MATLAB library you installed at the beginning of the project called MATLAB Support package for USB Webcams. Now what you need to do with this library is first access the webcam list and select the webcam you want to access. If you only have one build in webcam, for example, your laptop only has one built in webcam. Then you can use the following functions from the library to do this:
webcamlist;
mycam = webcam;
This gives you access to the camera stream from the webcam you have selected. Next you will need to take snap shots from this camera stream using the function:
RGBframe = snapshot(mycam);
2.From here we must do the Image Processing on the Image captured from the webcam.
You must process the frame you have captured so that it is suitable to pass into the trained CNN and classify the emotion in the frame. In order to do this you must:
- Convert the captured frame to gray scale.
This can be done with the MATLAB Image Processing function:
Grayframe = rgb2gray(RGBframe);
- Use a build in face detector object to detect where the face is in the frame and put a bounding box over it to determine the area of the image the face is in.
To instantiate the face detector object we can use the already trained MATLAB face detector CNN by calling:
faceDetector = vision.CascadeObjectDetector('MergeThreshold',10);
I think creating one Machine learning program is well enough for this project, but as an bonus part you could try to create and train this CNN to recognize faces and return a bounding box around the pixel area of the face if you want, you do have the tools now to create and train a CNN . You would just have to tweak the output from a classifier to a bounding box, but this information is widely available on YouTube and the internet.
Furthermore, you can get the bounding box from the face detector object by passing in the frame to the detector object as shown below:
bboxes = faceDetector(Grayframe);
*Note that is may be good to put a buffer around the bounding box by accessing the elements in the bounding box and either adding or subtracting a buffer variable to expand the window the you are going to crop. Remember to check for empty cases of the bounding box from the frame. Remember in MATLAB that indices start at 1 and you use parentheses to call array objects, not brackets.
- Now crop the image to the area of the bounding box and reduce the image size to 48x48 pixel size using the image processing functions:
 imCropped = imcrop(Grayframe,bboxes)
 imCropped = imresize(imCropped,[48 48]);
*Remember to account for cases where no image is captured by the frame or when the face detector could not detect a face and therefor returns no face bounding box. This can be done similarly to last lesson with a try-catch statement in MATLAB or an if statement to check if the variable is empty.
3.Now that we have processed the frame and made it compatible for the CNN we trained, the next step in the computer vision process is to classify the frame and produce a label.
This can be done easily with the classify function from the Deep Learning Toolbox:
label = classify(net,imCropped); %classify image with network
label = string(label);% convert label to string
Now we have finished with the Computer Vision part of the project and have all the functions we need to implement an app within MATLAB so that users without any knowledge of coding and run and use our functions.
Overview of GUI Development
This is what the rest of the project will entail. Taking this whole computer vision process from building the database, to creating and training the CNN, and then implementing the use of that trained CNN to classify emotion and putting it all together in a simple app interface. This is what next lesson will entail but I wanted to introduce you to AppDesigner in MATLAB. This is a built-in interface to help users create their own apps with MATLAB code. It has drag and drop features and also a code interface to it. We will be designing our apps in this interface then transition it over to a code file in MATLAB since some things can’t be done on the app designer like saving and loading you CNN. So, if you want type “AppDesigner” into you MATLAB Comand window this will open up the program and we can begin to explore it. I want to go over the general layout of an app so that you will know what your doing next lesson when we impellent all these function within the app interface.
I will go over in lesson the different aspects of an app and the different modes. Think of an app like a class or object variable. In general, the app code creates the properties of an app, which are basically variables that are inherent to the app that can be changed or manipulated across the different functions and are kind of like global variable within the app itself. These can either be public, meaning outside users can set and change them, or private, meaning they cannot be changed by outside users. Then you have the public methods which are the call back functions of the different UI components in the app such as button (aka the functions called when you press the button or UI component). Then the private methods in the app such as the method to create and initialize all the app component and layout of the UI components within the app interface. Then the methods to create and destroy the app when you open and close it. This can all be seen in the code interface of the AppDesigner and what we will be working with when we transition to a pure code MATLAB file next lesson.
Extra Resources
What is Image Processing (Video):
https://www.mathworks.com/videos/image-processing-made-easy-81718.html
MATLAB Image Processing Toolbox Documentation:
https://www.mathworks.com/help/images/
What is Computer Vision (Article):
https://www.v7labs.com/blog/what-is-computer-vision
MATLAB Computer Vision Toolbox Documentation:
https://www.mathworks.com/help/vision/
Intro to GUI Development on MATLAB:
https://www.mathworks.com/videos/app-designer-overview-1510748719083.html
Building Apps in MATLAB:
https://www.mathworks.com/videos/app-designer-overview-1510748719083.html
MATLAB Support package for USB Webcams Documentation:
https://www.mathworks.com/help/supportpkg/usbwebcams/
If you are having any issues with this process feel free to email me any time for assitance. alynch@ucsbieee.org